Updated 03/10/22. It’s exciting to try a new skincare product. However, if you dive right in without patch testing it first, you could cause a negative reaction. That’s why I always suggest performing an at-home patch test before using a new skincare product—especially if you have sensitive skin.
In this post, I’ll share how I perform an at-home patch test to avoid three possible skin reactions: allergic reaction, sensitivity (irritation), and clogged pores. I’ll also share additional insight from Dr. Joshua Zeichner, a Board-Certifed Dermatologist and Director of Cosmetic and Clinical Research in Dermatology at Mount Sinai Hospital in New York City.
What Is a Patch Test?
Before we talk about how to patch test skincare products, let’s talk about what a patch test is and why it’s necessary. In dermatology, a patch test is a diagnostic test used to determine which ingredients cause an allergic reaction in a patient’s skin.
“Patch testing is a procedure where patches containing different allergy-causing ingredients are applied to the skin to determine which one causes a reaction,” Zeichner says. “Oftentimes, it is difficult to determine which specific ingredient you are sensitive to, so patch testing helps with the detective work. You may not be able to tolerate a product simply because of a single ingredient it contains.”
At-home patch testing is slightly different. It involves applying a small amount of a new product to a specific area of the skin to see if it causes a reaction. This is important since you can rarely tell if a product is compatible with your skin until you try it. The last thing you want is to use it all over your skin and experience a negative reaction. And while traditionally a patch test is used to test for allergies, it can also be used to test for sensitivity and even clogged pores.
Should I Patch Test Every New Skincare Product I Use?
Experts recommended patch testing every new skincare product. However, I realize this is quite cumbersome, and, statistically speaking, the risk for an allergic reaction is pretty low. The fact of the matter is that the majority of the population doesn’t have allergies or sensitivities. That’s why, at the very least, I recommend patch testing any product that contains active ingredients like AHAs, BHAs, retinol, and vitamin C. These ingredients are actively working on the skin and are more likely to cause reactions.
With that being said, sometimes there’s no shortcut! If you know you have super sensitive or allergic skin, I recommend patch testing every new skincare product. The last thing you want is to cause a full-blown allergic reaction.
You should also patch test every new skincare product if you know you have an allergy to a specific ingredient, like fragrance. Even if a product is labeled as “fragrance-free,” it can still cause a reaction. That’s because, in the United States, fragrance allergens don’t have to be listed on the label. Plus, many products contain botanical extracts that contain the same potential allergens that fragrances do.
The same goes if you’re allergic to certain preservatives since there may be cross-allergies to other preservatives. In the U.S., brands aren’t required to list processing aids and impurities on the product label. In other geographies, like the European Union, brands are typically required to show sub-preservatives.
How Do I Patch Test for an Allergic Reaction?
While allergic reactions to skincare products are not terribly common, they can certainly happen. Anyone can theoretically be allergic to any ingredient, so patch testing is never a bad idea. Signs you’re experiencing an allergic reaction can include skin rash, severe itchiness, swelling, or burning.
To patch test for an allergic reaction, follow these steps:
- Cleanse skin to remove residue or oils.
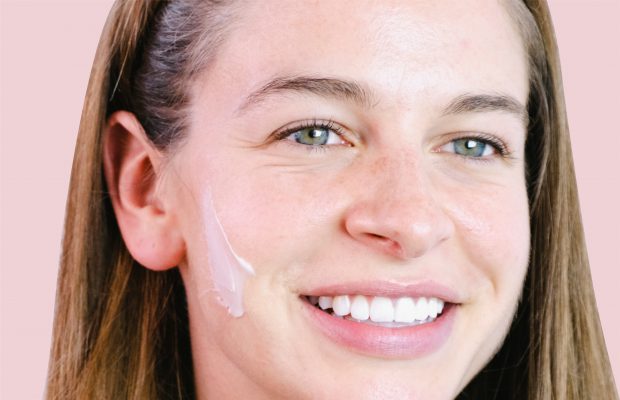
- Apply a small amount of the product being tested either above the jaw or behind the ear.
- Leave the product on for as long as you would use it (Example: cleanser, 1 minute; mask, 15-20 minutes; serum or moisturizer, overnight).
- Monitor your skin for up to 48 hours.
The reason I suggest waiting 48 hours is that it can take your immune system this long to respond to an allergen. You could also react more quickly, it all depends on your body and the severity of the allergy.
One thing to note with allergic reactions is that, since they’re systemic, they don’t always happen at the point of contact. This means you could experience redness, itching, swelling, or burning anywhere on the body.
It might go without saying, but if you experience any of these things, don’t use the product. I would also suggest consulting a dermatologist to determine which ingredient caused the allergic response.
How Do I Patch Test for Sensitivity (Irritation)?
At first glance, it may be hard to tell the difference between an allergic reaction and an irritation response. The main difference is that irritation will appear almost immediately after you’ve used a product, whereas an allergic response can take hours or days to appear. Another difference? Irritation is always localized, meaning it will only appear where you apply the product.
To patch test for sensitivity, the protocol is similar to patch testing for an allergy:
- Cleanse skin to remove residue or oils.
- Apply a small amount of the product being tested either above the jaw or behind the ear.
- Leave the product on for as long as you would use it (Example: cleanser, 1 minute; mask, 15-20 minutes; serum or moisturizer, overnight).
- Check for signs of irritation like redness, stinging, or burning.
It’s also worth noting that the skin’s barrier can differ in different areas. That means a product could cause irritation on your neck even if it doesn’t cause irritation on your face (or vice versa). While I suggest patch testing face products by applying them near the jaw, you might consider patch testing a product like a neck cream on the neck since skin here may respond differently.
*Note: If you’re patch testing a product that contains exfoliating acids, it’s normal for the skin to appear pink or tingle a bit. This should subside within 10-15 minutes, especially once a moisturizer is applied.
How Do I Patch Test for Clogged Pores?
This one is tricky since there’s technically no standardized way to patch test for comedones (clogged pores). There’s also no set timeline for when comedones will appear. It’s dependent on the individual, the product, the ingredients, and the skin’s microbiome, among other things.
“Comedogenicity refers to the ability of a product to clog pores,” Dr. Zeichner says. “Traditional testing was performed on animal models like rats or rabbits. With a movement against the use of animal testing, many brands are now evaluating comedogenicity through its use on human skin. Some companies may even be making claims about comedogenicity based on the use of ingredients that do or do not block pores.”
With that being said, if you’re particularly prone to clogged pores (like a Skin Type 1, 2, or 3) you can still perform your own at-home test. The cheek (close to the nose) is a good place to perform this kind of test. That’s because there is a higher concentration of oil glands and pores in this area.
If a product is going to cause breakouts, it isn’t going to happen after one use. To truly test for breakouts and clogged pores, consider testing a small area for 7-10 days to be cautious. If all goes well, you can proceed to use the product on your entire face.
The Bottom Line
Performing a patch test is the best way to avoid an unnecessary reaction from a new skincare product. It’s worth noting that it’s possible to develop an allergic reaction to something you’ve used before. The reason for this is unclear, but it’s certainly possible. If you think you’re experiencing an allergy to a certain product or ingredient, consult a dermatologist to get to the bottom of it.
It’s also possible to experience irritation from a product/ingredient you’ve used before if your moisture barrier is compromised. That’s why it’s important to make sure you’re barrier is strong and intact before introducing any new products to your routine.
Next, learn how to quickly calm red, irritated skin!
Celebrity Esthetician & Skincare Expert
As an esthetician trained in cosmetic chemistry, Renée Rouleau has spent 35 years researching skin, educating her audience, and building an award-winning line of products. Her hands-on experience as an esthetician and trusted skin care expert has created a real-world solution — products that are formulated for nine different types of skin so your face will get exactly what it needs to look and feel its best. Trusted by celebrities, editors, bloggers, and skincare obsessives around the globe, her vast real-world knowledge and constant research are why Marie Claire calls her “the most passionate skin practitioner we know.”


