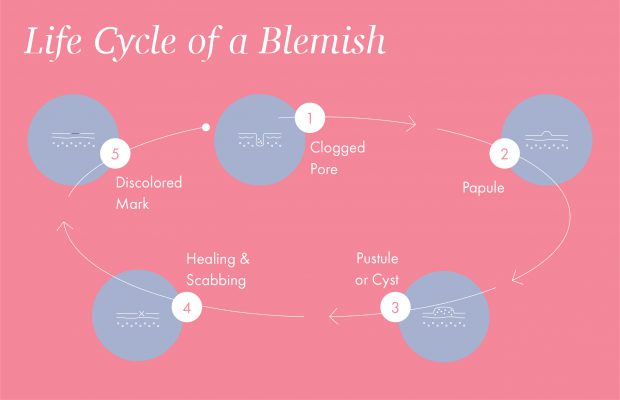
Did you know that each time you get a pimple, it goes through a life cycle? There are five stages of acne, and using the proper spot treatment at each stage is the key to getting rid of a blemish as fast as possible.
The reason it’s so important to understand the stages of a blemish is that you want to work with Mother Nature, not against her. Look at it this way—as soon as you get a pimple, your skin is doing everything it can to get rid of it. You want to support this process, not hinder it! I’ve been talking about the life cycle of a blemish since I became an esthetician over 30 years ago, and my experience has shown me that the number one mistake people make when they break out is using the wrong type of spot treatment at the wrong stage.
This was the inspiration behind my Zit Care Kit, which includes all four of our spot treatments. Each one is used for a different phase of your blemish to get rid of it faster. The kit also includes lancets and finger cots for extractions, plus an instructional card to guide you through every stage of a blemish.
Keep scrolling to learn about the stages of a blemish and which spot treatment to use at each!
Stage 1: Clogged Pore (How Breakouts Start)
All breakouts start the same way, and they’re set in motion well before they become visible to the naked eye. You know the story—oil and dead skin cells accumulate inside the pore lining, creating a blockage. Eventually, this leads to a small whiteish or flesh-colored bump, aka a clogged pore (sometimes referred to as a closed comedone).
In some cases, a clogged pore doesn’t ever progress into a full-blown pimple. Instead, it just sits there. Some people are very prone to getting lots of these clogged pores, also referred to as comedonal acne. This type of acne can be super frustrating since it doesn’t really resolve on its own. The only way to get rid of it is through manual extractions done by a skincare professional. At home, a combination of diligent chemical and physical exfoliation and patience is key.
In other cases though, a clogged pore becomes infected. This leads to inflammation, redness, and pus, or what we ultimately know as a good, old-fashioned zit. The best way to deal with individual blemishes is by using spot treatments instead of bombarding the entire face with potentially drying or irritating acne products. But before you immediately reach for a spot treatment with drying ingredients, keep reading.
Stage 2: Papule
If a clogged pore does become infected, it progresses to the stage of a blemish known as a papule. A papule is a raised, red bump where no whitehead is present yet. This means the infection is still deeper down in the skin and hasn’t made its way out yet.
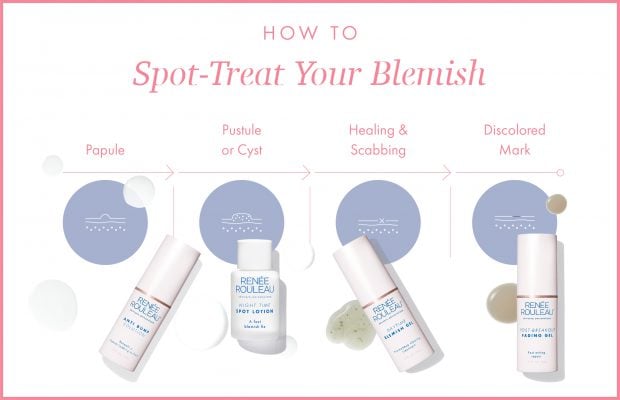
The Best Spot Treatment for a Papule (Anti Bump Solution)
This is the stage of a blemish where most people start to go wrong with spot treatments. I know the first instinct when you see a red, angry pimple is to dry it to oblivion, but this is literally the WORST thing you can do. In most cases, it will make your blemish last longer than it naturally would.
Remember how I said that at this stage, the infection is still deeper within the skin and hasn’t made its way out yet? By applying a spot treatment with drying ingredients, all you’re doing is drying out the skin on top of the blemish. This essentially creates a barrier of dry skin that prevents the infection from breaking through the surface as nature intended.
Instead, use a non-drying spot treatment with anti-inflammatory ingredients. Anti Bump Solution uses lactic acid to encourage the blemish to come to the surface sooner, but it doesn’t dry out the surrounding skin or create a crusty, scabby mess.
Stage 3: Pustule or Cyst
Once a blemish progresses out of the papule stage, it can take one of two paths—a pustule or a cyst.
The Best Spot Treatment for a Pustule (Night Time Spot Treatment)
The first possible path is a pustule, otherwise known as a classic whitehead. This is when a blemish finally breaks through the surface of the skin, which means it’s ready to come out. Now in most cases, I don’t advise squeezing at your own skin. But once a whitehead comes to the surface, the reality is there’s an infection that needs to come out. And sometimes, it requires a little help!
How to Extract a Whitehead
Start by softening the blemish by holding a warm cloth over it, or wait until you’ve just gotten out of the shower. Make sure your hands are clean, then wrap your index fingers in clean tissue or, if you have them, finger cots. Gently but firmly squeeze the whitehead out, making sure to reposition your fingers each time to avoid squeeze marks. My general rule is, three strikes and you’re out. If the infection doesn’t come out within three tries, it’s not ready, and the best move is to give it another day or two while you continue to apply Anti Bump Solution. In some cases, you may need to gently pierce the whitehead with a lancet to give it a path to come out. (I included both lancets and finger cots in the Zit Care Kit to make extractions easy!)
Once the whitehead is out, you can apply a drying spot treatment like Night Time Spot Lotion. Ingredients like sulfur and zinc oxide discourage any remaining bacteria and help soothe the pore lining after extraction.
Another option here is to apply a hydrocolloid pimple patch to draw out any remaining pus.
The Best Spot Treatment for a Cyst (Anti Bump Solution)
The second possible path once a blemish progresses out of the papule stage is the dreaded cyst, sometimes also referred to as hormonal acne. The most important thing to remember about a cyst is that it isn’t meant to come to the surface. This can be incredibly frustrating because it means this type of blemish usually lasts longer than the others, but it’s very important to resist the temptation to apply anything drying or squeeze at it.
In this case, you’ll just want to keep faithfully applying Anti Bump Solution until your body begins to reabsorb the infection.
If you find you get these types of blemishes around your period, you’re not alone. Here are my tips for preventing period breakouts!
Stage 4: Healing & Scabbing
Once you’ve gotten rid of a pustule (victory!), you enter the annoying scabbing phase of the healing process. It’s a pain, but ultimately something we need to allow our bodies to do in peace.
The Best Spot Treatment for a Healing, Scabbing Blemish (pimple patch)
First and foremost, RESIST the urge to pick at your scabs! I use to get so many breakouts when I was younger (plus I was a chronic skin-picker), so I get how tempting it is. But I promise all this will do is delay the healing process.
Instead, use a pimple patch. This basically acts as a bandage to keep germs and dirt away from your blemish as it heals itself.
Stage 5: Discoloration
As if dealing with the blemish itself weren’t enough, once it heals, you’re left with discoloration (otherwise known as the ghosts of blemishes past). Depending on your skin tone, you’ll experience either post-inflammatory hyperpigmentation (PIH) or post-inflammatory erythema (PIE).
PIH refers to marks that are typically dark brown or purplish in color, while PIE manifests as reddish marks.
The Best Spot Treatment for Discoloration (Post-Breakout Fading Gel)
The most important thing you can do to fade post-breakout marks is to wear sunscreen every single day. The sun’s rays will stimulate melanin activity, which will prevent the marks from fading.
I also recommend applying Post-Breakout Fading Gel a few times a week. This spot treatment uses a high concentration of exfoliating acids to target hyperpigmentation by speeding up the shedding of pigmented cells.
Getting rid of discoloration is complex and can require a lot of patience, but here are a few more tips for fading hyperpigmentation faster.
So there you have it, how to spot-treat a blemish at every stage! By doing this, you’re supporting your body’s natural healing processes and working in harmony with nature to get rid of a breakout as quickly as possible.
Last but certainly not least, there is a right and a wrong way to apply a spot treatment. This is the best way to apply a spot treatment so it works as effectively as possible (hint: it should be the last step in your routine).
Celebrity Esthetician & Skincare Expert
As an esthetician trained in cosmetic chemistry, Renée Rouleau has spent 35 years researching skin, educating her audience, and building an award-winning line of products. Her hands-on experience as an esthetician and trusted skin care expert has created a real-world solution — products that are formulated for nine different types of skin so your face will get exactly what it needs to look and feel its best. Trusted by celebrities, editors, bloggers, and skincare obsessives around the globe, her vast real-world knowledge and constant research are why Marie Claire calls her “the most passionate skin practitioner we know.”


