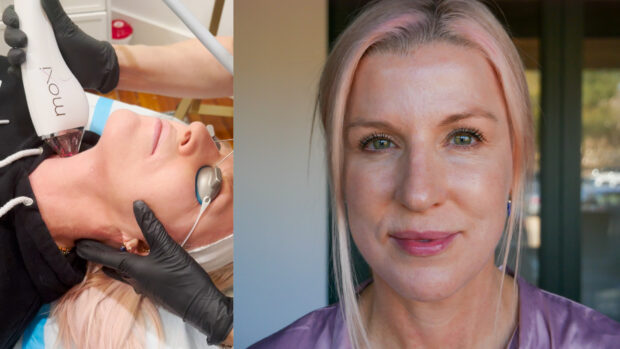
Ever heard of the MOXI® Laser? I hadn’t until certified laser specialist and master aesthetician Erma Morris persuaded me to do it. Having never undergone a facial laser before, I wasn’t sure what to expect. I love a good chemical peel but have always been hesitant to go forward with a laser. But now, having been in the skincare industry as long as I have (35 years!), I know they have become a tried and true staple in skincare– so I gave the MOXI laser treatment a shot!
Last January I had my first MOXI appointment with Erma at Refine Aesthetics in Austin, Texas (who also is a PRO partner of ours and sells our skincare line!). Let me share what the procedure was like– and if it’s really worth your time and money.
The MOXI Laser Procedure Explained
MOXI delivers non-ablative laser energy that revitalizes skin by correcting the initial signs of sun damage and aging. The primary focus of this quick, lunchtime procedure is to correct uneven pigmentation and improve tone and texture. Wondering if you’re the ideal candidate for MOXI? Let’s dive into the details!
What is MOXI Laster Treatment?
A quick 8 to 10-minute treatment, MOXI improves the overall skin tone and texture. As for the science behind it, this fractional laser creates micro-coagulation zones on the skin, sending it into repair mode and replacing the damaged cells with healthier, brighter skin. With minimal downtime or discomfort, this is a great option for any skin type looking to achieve younger-looking skin in just seven days.
What are the benefits?
MOXI is specifically designed as a preventative skin treatment to correct sun damage and early signs of aging without downtime. Through a gentle, fractionated wavelength, this laser corrects pigmentation issues and improves uneven skin tone and bumpy texture.
How many sessions are required?
While it is generally recommended to undergo three to four treatments with approximately four to five weeks in between, your provider will work with you to create a personalized treatment plan to meet your specific goals. This will include the number of treatments needed, a timeline of when you can expect visible results, as well as pre and post-treatment instructions.
What should I expect during the treatment?
Depending on your goals, the treatment usually starts with a numbing cream applied 30-45 minutes before the actual procedure. However, I decided to skip the numbing cream (the idea of numbing my skin freaks me out) and jumped right in.
I have a high pain tolerance, so while the laser was uncomfortable, it was manageable for me. During the treatment, the MOXI laser glides over the skin, creating a spicy, warming sensation. To counteract the heat, most providers, like mine, will also have a fan blow cool air directly on the skin to help minimize discomfort.
What were the immediate effects?
In my case, the laser portion only took six minutes. Afterward, my face felt incredibly hot, like jalapeño juice had been poured all over it! I live in Texas so I’m used to spice! Thankfully, a Velez cooling mask was then applied to soothe my skin. This biotech mask, commonly used post-MOXI, hydrates and soothes stressed-out skin. I was amazed at how much the redness decreased after just 15 minutes, though my skin still felt quite hot.
The real surprise came 30 minutes later. I went from feeling super hot to experiencing full-body chills within minutes. That’s when I realized my body was trying to regulate its temperature. Just like when you have a fever and get chills, this is simply a result of rapid muscle contractions as your body attempts to warm itself back up following a temperature rise. I was going through this exact process for about an hour as my body tried to reach the same temperature as my face.
What is the post-treatment care?
Post-MOXI protocol is simple: Wear a moisturizing sunscreen and stay out of the sun as much as possible. I simply washed my face morning and night with Purifying Face Wash, followed by Moisture Infusion Toner, and used Weightless Protection SPF 30 in the morning and Skin Recovery Lotion at night. I recommend using a lightweight moisturizer for the first few days to allow any remaining heat in the skin to escape. Avoid using anything too heavy as it will trap in the heat.
I also chose to double up on antioxidant protection since my skin was particularly vulnerable. I used vitamin C both topically and took 1000 mg. orally every morning, as well as sunscreen every single day. You must focus extra on sun protection, as your skin will be particularly vulnerable throughout the healing process.
Note: It says in the post-treatment care to avoid using a vitamin C serum during the healing process due to the possibility of a vitamin C acid burn, but Vitamin C&E Treatment uses a stable, no-sting formula that’s perfect for extra antioxidant protection and hydration. After all, your skin is going through incredible inflammation from the laser and that is when your skin requires antioxidants the most!
What is the healing process?
The healing process will vary from person to person for a variety of reasons, including the amount of sun damage on the skin, use of retinoids and exfoliating acids beforehand, skin type, laser setting used (I opted for level 2 out of 3), etc. Here’s how it looked for me:
- Day 1: My skin was very flaky, but this could be due to the fact I was using a .5 prescription retinoid in the days leading up to the treatment. My under-eyes were also puffy and swollen, and my skin, especially around my mouth, was rough and textured from all the movement. My face and neck were still very pink but not as hot.
- Day 2: My skin began to feel like sandpaper as I continued to peel, but it wasn’t too uncomfortable. Most of the redness had subsided, leaving me with more of a sun-kissed look. I did notice that my neck was a bit pinker than my face, likely because the neck area is typically more sensitive.
- Day 3: I began to turn the corner on day three. While my skin still felt sandy in certain spots, I could tell some of the tiny brown spots that typically appear after laser treatments, also known as MENDS (Microscopic Epidermal Necrotic Debris), were beginning to fade. I always considered myself to be a fast healer, but I was pleasantly surprised to see how nicely I was recovering.
- Day 4: My skin was no longer pink, but I decided to wear foundation anyway— and I wish I hadn’t. It clung to residual flakiness, only drawing more attention to the texture. Since there was no heat in the skin anymore, I decided to use Rest Day Masque that night. This moisturizing treatment uses Barrier3 technology to bind the skin cells together and reduce the appearance of flakiness. Afterward, my skin was instantly hydrated and much softer.
- Day 5: With continued use of Rest Day Masque, my skin was almost entirely back to normal. I was still experiencing minimal flaking around the nose, jawline, and neck, but most of it was gone. The sandpaper feeling was also gone, meaning I would likely be back to normal in another day or two.
- Day 6: I woke up on day six with no visible flaking or dryness and knew I’d reached the end of the healing process. My skin was visibly brighter and more firm.
I was very impressed with how quickly and beautifully my skin healed. While there wasn’t much pigmentation to correct, I did see improved brightness and a renewed glow in less than a week.
How much does MOXI cost?
The treatment costs around $750 per treatment area. Treatable areas include the face, neck, chest, hands, arms, and legs.
Why I Chose the Treatment
I’ve always been super dedicated to my skincare routine, so I went into this treatment knowing I didn’t have a ton of sun damage to fix. However, I decided to give MOXI a shot anyway. I mean, if it could make my skin tone even a little more even-toned and brighter, why not?
My Results with MOXI Laser Treatment
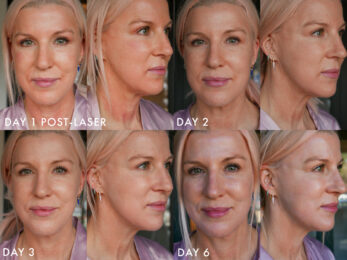
MOXI Before and After
After just six days I had a noticeably more even skin tone and brighter glow. Here are the results I documented in the days following the treatment.
Essential MOXI Treatment Aftercare Tips
While MOXI post-treatment care doesn’t consist of much, there are a few things to prioritize to get the most from your experience. Other than being on top of your sunscreen, here are a few other things to keep in mind.
When can you exfoliate after the procedure?
As with almost any facial treatment that causes the skin to peel and flake, you don’t want to use any form of physical or chemical exfoliation until your skin is no longer flaking. This is the case for several reasons. For one, your skin is significantly more sensitive during the healing process since it is more vulnerable than usual. Second, these treatments are done to increase cell turnover and boost collagen production, meaning you should let them heal naturally in order to receive the full benefits. Exfoliating before your skin is ready will likely cause more harm than good.
Can I wear makeup after getting it done?
You must go without makeup for the first 24 hours following the treatment. After that, you’re welcome to go about your routine as normal. However, as I mentioned earlier, the application may not go as smoothly as you’re used to. Depending on how flaky your skin is, a light foundation may accentuate any texture. This is why I recommend opting for a heavier, more hydrating foundation during the healing process.
Final Thoughts and Recommendations
All in all, I was very pleased with my first laser experience. If you’re someone who has been hesitant about trying laser treatments like I was, this is a great, super quick option for dipping your toes into the world of lasers. It’s also ideal for those with little to no downtime in their schedule. If you have sun damage, pigmentation, or signs of aging that you’d like to address, I highly recommend this treatment for effective skin rejuvenation and I will absolutely get it again. My skin is almost 55 years old so it’s very beneficial for me to get an extra boost here and there, above and beyond my at-home skincare routine!
Celebrity Esthetician & Skincare Expert
As an esthetician trained in cosmetic chemistry, Renée Rouleau has spent 30 years researching skin, educating her audience, and building an award-winning line of products. Her hands-on experience as an esthetician and trusted skin care expert has created a real-world solution — products that are formulated for nine different types of skin so your face will get exactly what it needs to look and feel its best. Trusted by celebrities, editors, bloggers, and skincare obsessives around the globe, her vast real-world knowledge and constant research are why Marie Claire calls her “the most passionate skin practitioner we know.”
")

